Nemo / Under The Sea Cake  

Posted by: Audrey in

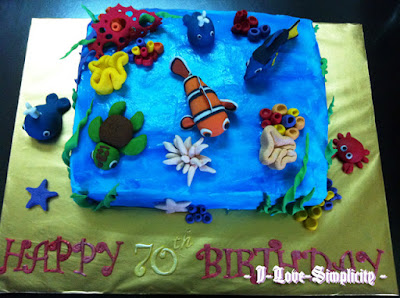
Woohoo! Three posts in a day...*grins* This is my other big project ordered by another colleague and friend for her dad's birthday:

Yes, I kid you not....this was really for her Dad's 70th birthday! When at first she told me about a Nemo / under the sea theme, I was like cool...I thought she meant it for a nephew or niece. But then when she said it's for her dad, I asked if he would be okay with cartoon characters on his cake. She said it's something that she would like as well, seeing how she likes cute things and stuff....LOL! And then she proceeded to tell me that her dad is a fan of the arowana fish (which looks like THIS), but she knew that it was beyond my capabilities (thank goodness...whew!) so she wanted something that resembled the sea / water...hence, Nemo. 


Another view of the whole cake...I loved the colors to say the least =) Another quite tedious job, considering I had to color the fondant many times over, but it was so worth it seeing how it came together *grins* 

Cake was chocolate cake (yes, I keep getting a lot of chocolate cake orders...LOL!) with a strawberry puree filling in between the layers. The cake is then frosted with fresh cream and swirled with piping gel to create a 'water' effect. Initially I wanted to try and get the frosting as smooth as possible, but my frosting skills are still not up to par =/ Thank goodness this effect is a bit more forgiving in that the frosting does not need to look smooth. In fact, I was even told that the swirls looked like ripples of water...LOL! Blessing in disguise *grins* This was also my first time playing with luster dust...if you notice the fondant letters spelling out 'Happy 70th Birthday', they look a little shiny =) I loved how the number 70 turned out. I used a little pearl luster dust mixed with a few drops of lemon extract to get a 'paint' texture and brushed it over the yellow letters. The red ones got disco dusted, but the effect didn't turn out so well as I tried the same method...only to have the dust stick to my brush more than on the fondant -_-" After that, I found out that I'm supposed to just wet the fondant a little bit and sprinkle on disco dust instead of brushing it on. *sigh* Trial and errors, no?


Close up on the main characters....'Nemo' is not an exact replica, but I guess for a first time, it was OK. LOL! I underestimated the difficulty of making this little fella that I spent almost 2 hours trying to get him right =P The little strips of black and white took me ages to 'perfect' and stick on. Clumsy fingers and a sleepy head didn't help either. LOL! 'Dory' on the other hand took considerably less time as I've had a bit of practice with 'Nemo', but I think I prefer 'Nemo' over 'Dory' any time =P My 'Dory' needed WAY more practice to perfect. LOL!


My favorite to make was actually little 'Squirt' here! His coloring was the hardest to get right....I botched one attempt, mixing colors till the color resembled mud. Eww. Second time around, I tried it with some green, yellow and if I remember correctly, a very SLIGHT drop of brown. Still not quite there, but it did ok for my turtle =P I dropped him a little too hard onto the frosting that he sunk into it....oops! But still cute nonetheless *wink*


Little whales and starfishes! The whales are surprisingly easy to make as well, though I had a little 'mishap' as I was delivering the cake to my friend. I had set the cake box (containing the fully decorated cake) in the front seat of the car and was just about to start the car when I heard a thud from the cake box. O.O" Opening the cake box I saw the little whale on top of the cake (pictured behind Nemo in the third photo above) had slid down and off the cake!! OMG! It turned out that the position of the car seat made the cake box a little slanted, hence the cake was a little lopsided causing the whale to slide down. Frantically, I went back inside to grab my spatula and tried my best to smooth back the frosting as much as I can...position the cake upright properly in the seat and set the little whale back in its place. It sat back okay, but the little 'spout' of water went missing. *sigh* I had no time to remake the spout, so the whale had to go without =( Lesson learnt:  be ever prepared for any mishaps that might occur when delivering cakes to your clients!


Little crab with some corals and seaweed at the sides of the cake =) I had so much fun making the corals and seaweed...so easy really. I just wish I did these a bit earlier so that the fondant would have enough time to dry and harden a bit...then when I put it on the cake, they wouldn't go limp so easily, especially with this fresh cream cake that had to be chilled in the fridge before hand. 


All in all, I'm quite happy with the results of these few projects =) Got good reviews from my friends as well...so let's hope for more orders coming my way so I can keep honing these skills! *crosses fingers*

Mickey Mouse for Marcus  

Posted by: Audrey in

After my initial success with the Angry Birds cake for Matthew, my manager 'booked' me to make another cake for her elder son, Marcus =P It was a little confusing in the beginning as Marcus seems to keep changing his mind on what he wanted as his birthday theme....we started out with Pirates of the Caribbean (that would have been interesting, no? LOL!), then changed to Transformers (??!!!) and finally he settled on Mickey Mouse (whew!). 

There were SOOO many inspirations for this theme, especially with the latest Mickey Mouse Clubhouse series running so rampantly on TV these days, but Susan (my manager) finally settled on a garden-like theme. She also wanted some cookies in that theme as goodie packs for Marcus' classmates (they plan to celebrate his birthday at school), so I started off early...

I started with the cookies first, since they take the longest considering the drying time and stuff. Susan loved an idea that she found online where there were cookies in the theme of Mickey, hence these pants....


Gloves...


Shoes (though I think I botched these a little...they looked more like kidney beans to me! LOL!)...


and Mickey silhouettes! I couldn't find cookie cutters of the other shapes (except for Mickey's head) so I had to hand cut the cookies. Although a tad tedious, it was still fun and cool to see the shapes come to 'life' (especially after icing them). Thank goodness the shapes weren't that complicated either, so I didn't have a really hard time cutting the shapes out with my flimsy knife. *makes mental note to get better knives ASAP* So worth it seeing them come together =) 


The packaged cookies =) I borrowed Justina's heat sealer for the packs, and they were a cinch to pack! I LOVE the colors *grins*


I didn't have a proper bag / box to keep the cookies, but Mom remembered this picnic basket and it somehow looked perfect for the theme! Garden, picnic basket...get it? LOL! 


And then it was down to the cake! I'm really proud of this little achievement...finally got to play with MORE fondant, and thank goodness it yielded good results! Took me quite a while to finish decorating it, but when it all came together, I sat back, took a look and heaved a satisfied sigh =) This was the photo that I posted on my FB page right after finishing it. 

Cake is Pioneer Woman's chocolate sheet cake, but I baked it in two 8-inch round pans. I then frosted the cake with Our Best Bites' chocolate frosting, which was so good by the way =) It was a chocolate version of the frosting on the rainbow cupcakes, but same light and airy texture and holds its shape REALLY well! I was especially worried that the fondant will sweat and melt with my previous almost-disaster of Susan's cake, but this frosting didn't need any refrigeration, so there was no hassle with melting / sweating! YAYY! The fondant used here was also quite nice...a bit more expensive than the previous ones that I bought, but since it yielded better results I am happy =) 


Susan saw the photo on FB and IM-ed me, saying that she liked it but also gave me some feedback on how she would prefer the toothpicks to be covered with bushes, but I felt that it might get too crowded, so I did the next best thing...I made the toothpicks into stems and added little leaves to it to make them look more like flowers. Heh! 


Cake was covered with fondant, and almost everything else were made from fondant....except the Disney characters =P I didn't have the courage to attempt these famous figures yet, and Susan managed to find small figurines from the toy shop so they did well for fixtures on the cake. Heh!


Also added the candle into the cake to see the final result =) I found this in ICCA...and it matched the garden theme and colors perfectly! Yes, Marcus turns 4 this year...such a lucky boy to be getting such an elaborate cake for his birthday! I'm probably jealous coz I don't remember having such a grand birthday...ever =P Kids are so lucky these days, aren't they?


These were my other proud achievements...I made little blue birds! I know, they are so simple and stuff, but coming from a so-called 'self taught' amateur baker, I find it quite an achievement. They were surprisingly easy to make after I've gotten the hang of it. I like this little effect on the banner as well...learned about a new tool called the Brigitte letter stamper. It makes the embossed words into the fondant...love it, and will probably use it more when I get the chance to *grins*

Baking Projects Up To Speed  

Posted by: Audrey in ,

Whew...what a busy month! Work had been crazy with some tight deadlines, had some big baking projects almost back-to-back, and also been slacking with my workouts *sigh* But I've almost been consistently jogging with my friends every Sunday...training for a 10km run! So far, progress had been slow...managed ONE time of a 10km run, but with a time of 1 and a half hours and I'm half dead with my knees throbbing. Eep! So, will progressively try and push myself (but not too hard, as to save my knees!) to get to 10km eventually. Fingers crossed that I will get there...the run's in June! o.O"

Anyways, amidst some of my big projects (they will have their separate posts...will update ASAP!), here are my other 'smaller' projects that I've managed to squeeze in over the past month or so: 

Fondant sheep figurines...heh! These were inspired by another famous blogger's sheep figurines, but the ones I did here had different expressions thanks to my friend who ordered them. She suggested that the sheep have funny faces, and so they did....*grins*


The cupcakes all lined up for delivery...I had much fun making them! The cake was chocolate cake with a filling of chocolate ganache and Swiss Meringue Buttercream.


One last look at them...I particularly like this little guy. Le blur face is so funny!


Rainbow cupcakes! At a time where rainbow cakes / cupcakes were all the craze in the blogosphere (I think they still are now =P), I just did a random version of it. I tried my best to follow Our Best Bites' version of it, but the colors seem to meld into each other, and didn't seem as bright as it should be =/ I DO love the frosting recipe though (also from  OBB's recipe). It's light and airy, so unlike the normal buttercream version...too bad I botched it with my funky piping! That shape of the frosting right there reminds me of something I probably should not mention when talking about food. LOL! Oh well...lesson learned. 


Another semi-fail project. These were supposed to be orange cranberry muffins! On the up side (if there ever is one), they look fine - almost tasty-looking - in photos. The down side is, the texture is so off that I didn't want to eat it after one bite. I boil it down to the liners. These paper liners don't fare well with denser cake / muffin batter. With an airy cake batter, they rise beautifully, but put in a muffin batter, they sucked. Heck, even the usual cupcake liners that I used didn't fare very well too with muffin batter. They were a bit better than these paper ones, but still didn't yield as good a result as I'd wanted =/ I don't say this lightly...I've tried these paper liners with the chocolate cupcakes (for the sheep), these orange cranberry muffins and another recipe of orange muffins (which I didn't take photos of). All of which did not have good results =( The only good result it yielded was when I tried it with a light white cake batter. So my two cents' worth: these paper liners only fare well with light cakes....


These were my version of Annie's Eats' Peanut Butter Banana Cream Pie with Hot Fudge Sauce....only I did it in a tart version! *grins* I was a bit lazy to do the big pie version, so I bought some ready made tart shells and just filled them =) I also didn't make the fudge sauce, but used chocolate ganache for the drizzle. I've never had banana cream pie before, so this version was absolute BLISS! The layers of chocolate, peanut butter, banana slices, vanilla pastry cream and whipped cream = deliciousness in every bite. In spite of this version not having banana liqueur in it, the banana flavor did come through from the banana slices, so even without it, they're still great. Though I sure wonder if it'll taste even more amazing WITH liqueur....too bad we can't find them here in Malaysia.  I would definitely attempt the big pie version next! I LOVE her braided pie crust! Might try that too...heh!


Going on a spree, these were made on the same day as the peanut butter banana cream tarts...lemon curd tartlets! Again, the shells were ready made shells, but the lemon curd was made by yours truly. I had quite a few egg yolks leftover from making the rainbow cupcakes, so lemon curd it is! I followed the curd recipe from my Mom's trusted lemon meringue pie. So yum! The tarts here were topped with dollops of whipped cream (since I still had leftover)...though I think if we had meringue it would be also just as good (if not better!). Yum!

As if that were not enough (I had leftover from the tarts), I found another great recipe from Annie's Eats (I SOOO love her blog....her recipes always yield successful results for me, and they taste awesome! Love her photography as well!): Lemon curd cupcakes! Okay, her original recipe was called Key Lime Pie Cupcakes, but I figured limes, lemons...they're about the same thing. And I didn't want to waste the lemon curd so I adapted it to fit mine. I used the cupcake recipe, but filled the cakes with lemon curd and topped with more whipped cream =) These cupcakes were fluffy and airy...coupled with the tangy lemon curd, they were quite yummy!

Cake pops! These were made at my friend's house where she gathered a few other friends and we did a sort of 'baking party' =P It was so fun catching up with each other, and also scary coz we experienced not one, but TWO earthquake tremors at her condo! The place was literally rocking side to side and we quickly rushed down to the lobby. Thank goodness nothing else happened! The cake pops? Well, let's just say these were some of the nicest ones =P We got so tired towards the end, the cake pops looked like blobs...LOL! Too much attempted at one go I guess...but I have to mention that using a microwave to melt the candy melts / chocolate makes for a MUCH easier way to make cake pops compared to a double boiler! Less margin for error. Too bad I don't own a microwave....oh well.


My version of Martha Stewarts' Black Forest Cupcakes...I love, LOVE the recipe for the chocolate cupcakes! They were SO soft and moist...goes SO well with the cherries, pastry cream and ganache! My only gripe with this is the amount of cherries used were a bit too little =P Will use lots more cherries in it to enhance the taste....probably add a teeny bit of brandy to give it more oomph next time too! *grins*


And my latest attempt to make bread....this was my version of an Italian bread. =) There were supposed to be 'checkers' on the top of the bread, but I scored the checks a bit too lightly & sprinkled too much cornmeal on it so when it proofed and baked, the ridges disappeared =/ It was surprisingly easy to make though, especially with my handy Kitchen Aid dough hook! It kneads the dough out with such ease I could cry! And when it first came out of the oven...OMG. The crust was amazingly crisp and chewy, but bite into the center, it was hearty yet had a soft texture....SO good! The family finished this in a day...so maybe will attempt another bread tonight *wink* I think I'm getting hooked (no pun intended) on this! Hehe!


Yup, so basically that's about it! Will continue with my two other BIG baking projects...so stay tuned!